

…for the NEW YEAR. Now that I’ve rested with a long winter’s nap, I can refresh and renew…and share some excitement. I’ve been collaborating with www.thefabrichut.com , using their fabrics to design special quilts. They have special “fat fifths” and extra-wide fabric that is closely woven with a delicate polish and also awesome buys on titanium rotary blades!! That collaboration is continuing as I’ve designed a pretty little baby heart quilt and await the fabric to arrive any day. I’ll have a sweetheart pattern with the scraps, too. Join their Facebook group to enjoy quilts from all over the world and fun conversation.
However, I’m also starting some collaboration with https://madamsew.com/ , which is another company I love. They specialize in sewing tools to make sewing easier and more fun. Full confession–I’ve already bought almost every item in their inventory! They find wonderful tools and often run special prices. They are incredibly active on Facebook and other social media. Check them out! I’m thrilled to collaborate with them.
I’ll be soon making some videos featuring my patterns using their tools and sharing the techniques, which you then can apply to other projects. They cater to “sewists” of all kinds, not just quilters. Since I offer totebags, aprons, sweatshirt jackets, etc., that concept appeals to me as well. I’ve certainly done a lot of custom sewing and especially alterations over my many decades. I’ll share some of those tips, too.
I’m starting my year with lots of new ideas and plans; since I’m calling this a “new leaf”, I’ll tell you how to make a leaf or page or door. It’s so easy that I’m almost embarrassed to call it a tip.
1) If you plan to add some embroidery on the little “door”–it’s easier to hoop and embroider BEFORE cutting. Leave the embroidery stabilizer in place–it can remain as interfacing.
2) Take two pieces of fabric the same size, as little as 3/4 in. or as big as maybe 5-8 in. (For a larger one, you might want to add some interfacing to stiffen it or possibly fleece–I’m fond of fusible fleece for this.) The pieces don’t have to be square, just matching (e.g., a petal, leaf, flag). Think NOW about whether or not you want a closure–you might want to sew on Velcro, for instance, to just the right side INSIDE or add a little elastic loop in the seam for a button.
3) Put the two pieces together right side-to-right side and sew around 3 sides (1/4″ seam) like a pillowcase, leaving the side to be inserted into the seam unstitched. (Clip a little triangle off the corners to make it easier to turn.)
4) Turn it right side out. Now it’s ready to press. Also add any quilting, and if you want, a closure, such as a buttonhole.
5) Finally, insert the side with the raw edges into the piecing seam, making sure the little “door, flap, leaf, even tooth!” is right side up on top of the quilt.
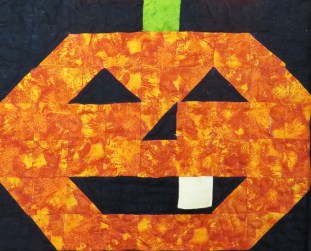
I used a little “door flap ” to make a tooth. (It’s metallic GOLD! in “Jackson O’Lantern Five.”)

The tail, chin, and fins all “flap.” ( “Bubba Bass Wears Plaid“).

The flags are tucked under an applique, but the little square “castellations” are sewn in the seams. (This pattern is on the drawing board! It’s a twin-size quilt.) The real “door” is below–it’s a drawbridge! Notice TWO buttons because it can open and close.

Another set of “real” barn doors in the art quilt below (pattern not available).

I hope that adding 3D details will be a new leaf in your own quilt adventures. Keep watching my posts for the “Rainbow Castle” and hearts patterns soon to come. Happy New Year!