
…and for quilters, that often means having to tackle a T-shirt quilt.
We all know that these days, T-shirts rule; most teens have a drawerful. (Except MY son, well past graduation, who hangs HIS in categories on hangers—easier than folding.) But back to quilting. Most quilters have been or will be asked to make “The T-shirt Quilt.” It’s almost a rite of passage, yet there’s no real pattern for it. So how do you approach it other than by screaming and hair-pulling?
Here’s one I made this month for a baseball enthusiast. She’s played almost all her life, so I had many sizes and several teams of baseball JERSEYS! Interesting.

So where do you start?
1. Cut off the sleeves, neckline, back seams and backs with no printing (I did leave the one jersey intact at the request of the customer and the V-line neck of the little pink one.) This starts to get the pieces ready and gives you an overview of colors and amount of fabric you have to work with.
2. Estimate the amount of fabric for accent and backing and get an idea for a theme. Mine was obviously baseball, but it might be team colors, sports, or something more unusual like my son’s science T’s or dragon T’s. If nothing else, determine some favorite colors. With the theme in mind, buy novelty or colored fabric. (No, I can’t tell you how much, but don’t forget the backing and binding!)
3. Plan out a design on graph paper. The absolute easiest might be rows of different widths to allow for different amounts of printing. Calculate the rows to match the size quilt you want to make. Another method is to make every square the same and put sashing around it (not that easy because printing comes in all sizes). You could, however, start with the largest to determine size and add filler to the smaller pieces. Or put several smaller pieces together in one block.
4. Consider the theme or special elements for centerpiece. I designed a baseball diamond into the background and appliqueed a jersey on the top. You could add a grouping of special T’s or color grouping instead.

5. Get plenty of fusible interfacing. It helps stabilize the stretchy knit. Also, I found it was easier to measure the size on the stabilizer, fuse it and cut around the edge than to cut the knit first. (While jerseys don’t stretch much, a couple of the T’s were really stretchy and definitely needed it!)
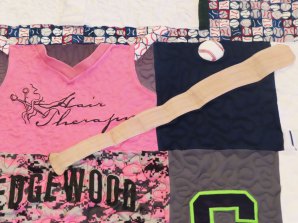
6. Pay attention to color. Look at the first photo and notice how I balanced the blacks and dark grays, and I made a point to distribute the pinks throughout. Look again and you’ll see I ALSO distributed the 12’s and 6’s. I also had ONE striped T, which I used for filler, sometime horizontally and sometimes vertically.

7. Keep your wits about you when you deal with 6 or 9, 1 and 0–it’s way too easy to get them upside down (speaking from experience!) Ditto on writing.
8. For fun, add some appliquees. I added a baseball bat and ball (which I puffed up with several layers of batting). The ball was on one of the fabrics–easy to cut out! The T in the center was “holey”, so I first backed it with fusible fleece. I used the fleece on the bat and ball as well–not really necessary, but it helps them stand out a bit. I also added baseball grosgrain ribbon around the diamond.
9. Finished and ready to quilt? I’m fortunate enough to have a long-arm, so it didn’t take long. I quilted AROUND the appliques and around the areas of shirts I’d left with buttons down the middle because they get too bulky–also some collar areas.

10. Don’t forget the back! Add a label with name, graduation date, quilter, or other info with embroidery. I even kept out the back of the little pink shirt because it had the grad’s last name! Just do something cute.

P.S. No, I did not use plain white cotton on the back. It’s a woven polyester sheet (from Big Lots!) Not only does it blend with the baseball print binding, but the silky poly goes well with the silky jerseys!

I hope these tips help…so go create your own and send me a pic!!