ADD 3-D EMBELLISHMENTS for texture and just plain fun.
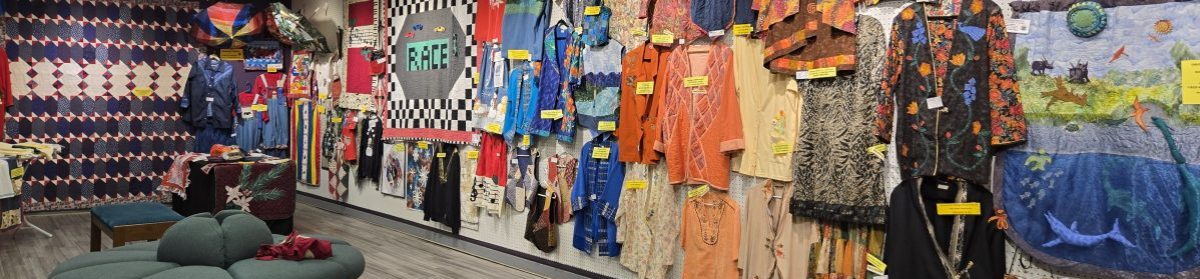
See PHOTO ABOVE for “Embellishment: Wearable Art and Accessories” solo exhibit at Montgomery Learning Arts Center–Anita P. Folmar Gallery, August 2025. I displayed over 200 pieces with photo and sewing embellishments.
More than just quilts, I sell patterns for throws, runners, hot pads, totes, decorated clothing and gift items. I’m not only a designer, military wife, and photographer, but I taught English for 42 years. I value clear instructions . I also include lots of diagrams and photos in my patterns.
Just pay through Paypal (with credit card) and the digital pattern arrives later at your computer–it’s not automated, so give it some time to process, please!
If you “FOLLOW,” you get the tips/photos delivered to your phone or computer. Please LIKE me and please SHARE! Thanks SEW much!
Libby Christensen of Christensen Creations Scroll down for my tips and chats!
Libby Christensen, designer/owner of SewGoCreate.com wins a top regional award at Montgomery Museum of Fine Art….with a QUILT picture of quilts. “The Quilts at Poppy Lane Farm” depicts a clothes line of quilts with house, barn and tree, perfect for the “HOME” themed exhibit.
Winner Winner, Chicken Dinner!
My “The Quilts at Poppy Lane Farm” wall hanging won a huge award–one of top three–at a regional art competition, and it is currently on display into September 2025. It’s one of about 60 pieces juried in (from 430) for the themed “Home” show of the Montgomery Museum of Fine Arts in Montgomery, Alabama. It won the “In Memory of Rick Mills” award. What an honor!
I’m especially thrilled that a fabric piece won as art!
The techniques I used include applique (buildings), fused applique (tree and cat), 3-D applique (barn doors, quilts and hanging clothes) , free-motion quilting (grass and pebbles), free-motion embroidery (the poppies), and photography on fabric (the purple quilt is my design, a photo on fabric of MY quilt), and the biggest quilt is pieced and quilted from vintage fabric. I also made the little clothes from scratch. For more details, scroll to June 5, 2023, blogpost. Also, there’s a video on home page–on the far right.
It was definitely a labor of love, and I was so pleased when it made a Best in Show at the Prattauga Art Guild Summer Show two years ago. It was also featured in Nancy’s Notions. However, this is a HUGE regional show and a $1000 prize, so it’s especially wonderful.
In the same show, I have another wall hanging juried in: “Live Oak Bay.” (below) It doesn’t have the 3-D touches, but it’s interesting because it was a Keepsake Quilts Challenge project. I was only allowed to add two fabrics to the ones provided, so I chose the brown for the tree and white for the background and “frame” border. The blue sea, yellow sand and pink cottage were scrimped from one piece of batik, and the flowers “fussy-cut” from the green used for the tree. I pieced a log cabin background, cutting up a blue/white floral for the sky. The lavender bushes and magenta yoyos are from two other required fabrics. For more details, scroll to June 28, 2024, blogpost.
Unfortunately, I didn’t get it to the challenge on time, but it’s received some recognition locally, which is always fun!
Forgive my crowing, but awards are really exciting! It’s so nice to be able to show and share my work. If you live near Montgomery, AL, you can visit the museum, and on Sept. 13, 2025, I’ll be there all day with the MMFA Fall Festival–I even was filmed for a promotional commercial! Y’all come!!
Patriotic patterns on half-price sale this July 2025: quilts, throws, hot pads, runners, apron! 3-D, folded pocket, strip piecing–good variety
FIZZ, SMACK, FLARE, CRACK!!!
What an exciting year to be celebrating July 4th!! As an Air Force wife, I have designed quite a few. Enjoy checking them out below, both the little projects and the big ones!
Do you want a QUILT? Try “Salute the Colors”! Made here in queen-size, but can very very easily be sized for a throw or smaller quilt. AND it’s doesn’t have to be red, white, and blue. (As much as I love my country and flag, it’s not my choice of bedroom colors!) https://sewgocreate.com/product/salute-the-colors-cc2301/ $7.50.
Think about next July, but also think about Christmas and birthdays. A lot of these patterns are quick projects, so buy ahead! Be ready! (Do as I say, not as I do….I’m never ready!! HAHAHA!!)
Enjoy the holiday and enjoy browsing through the links!
Pumped up in hot Alabama, listening to fireworks–hoping the neighbors don’t burn down the neighborhood, Libby
I do (especially when they’re on sale!!) If you don’t, then you might want to look again. There are so many varieties now. One new one is the 10″x 2 1/2″ mini-strip pack.
I also explain how and why to make a diagonally pieced binding. So if this sweet little lap quilt appeals to you, go check it out. I just launched it today, 5/7/25, and have it half-price ($3) for the first week. The strip packs are also on sale right now (just saying….)
If you sew, you are probably bemoaning JoAnn Fabrics’ demise… as am I because I always depended on it for notions. Woe are we! I can, however, share my “goto” for needles. Try this website:
WHAT SIZE? Most of us use size 80 for regular sewing. Size 70 is for more delicate fabric–the needle is a smidgen smaller. Size 90 is for a bit heavier. Size 100 is often recommended for denim or canvas.
WHAT ELSE? There are many other specialized needles. For instance, embroidery needles have a longer eye, giving room for the thread….to have less friction, maybe? They come in sizes 75 and 90–75 is better for dense embroidery. Specialized metallica are made for those pesky but beautiful “metal” threads, whether sewing or embroidering. There are also leather needles I’ve never needed to use. As a quilter, you are probably familiar with quiltingneedles, which are sharper, not ballpoint, to penetrate cotton and/or batting more easily. Sharper yet are the special microtex needles, made for micro fibers, polyester, silk, foils, and coated materials. Of course, there are also double and triple needles for pin tucks. (Not going there today!)
HINT! Since working with the Superior needles, I’ve found my everyday favorite is the topstitch 80 needle. I find I can use it for regular sewing and switch to embroidery without changing the needle. It has a bigger eye that works well for embroidery.
HOW TO STORE and KEEP UP WITH SIZES? My machine has a needle reminder for the one currently in the machine. However, what do you do when you switch sizes? I used to put the needle back in the pack upside down so that I knew it was used. Then I heard about a solution, using an old-fashioned tomato pin cushion. I mark each section with a needle number or name.
NOTICE! One section is packed!!! That is for old needles! I keep them to use on paper. Yes, I sew on card stock to make tear-off labels. The needle with no thread perforates the card, but it’ll dull needles, so I purposely use old ones. Some people make quilted cards on card stock, too.
I also use old needles to hang up up wall hangings. I kid you not–they are stronger than you’d guess. They’d also hold up posters.
You can use the following link or search for Fabric Hut Quilt and scroll down to “Marc and Libby.” The first one was the Heavenly “Angel Wings Baby Wrap”–hints on sewing my new pattern https://www.youtube.com/watch?v=prUBxf4fuQ8 The pattern is here:
The next video will be LIVE from my https://sewgocreate.com Sewing Studio on Thursday afternoon, June 3, 2025, 3 or 4 p.m. (not sure yet), and then it’ll continue to be posted on youtube.com to watch later if you like. I don’t have the exact link yet, but I’ll send it soon.
It’s a new pattern that uses 4 packages (40 each) of 10 1/2″x 2 1/2″ strips: designing, making the odd- size pieces fit together and creating a diagonally pieced border. No extra fabric needed except for backing.
This is Morning Mist available at thefabrichut.com . So pretty and light for spring or summer, mints and teals, currently on sale.
Launching a darling new pattern, “Angel Wings Quilted Baby Wrap. It wraps precious baby up like a cozy little burrito.
After a long hiatus, I’ve finally gotten back to designing. My “Angel Wings: Quilted Baby Wrap” is perfect for a newborn, a fabulous gift. I’m launching it today, MAY 9, 2025–for two weeks, it’ll be half-price, just $3.
“Angel Wings: Quilted Baby Wrap” CC#2330
It wraps baby up like a burrito.
Step 1–up from the bottomStep 2–wrap a wing overStep 3–burrito ready to be warmed up
Made of 64 5″ charm squares (you can get them from thefabrichut currently on sale https://www.thefabrichut.com/collections/charm-packs?page=2 ), and 1 1/2 yds. of backing and batting, it’s a quick-to-source and easy-to-make little quilt. No binding.
What did I say??? Yes, NO binding. It’s turned, then quilted. Easy does it. I backed the sample with flannel (properly, “cotton flannelette“). THAT’S A TIP. I like to back my baby quilts with soft cotton flannel to dial up coziness.
A bunch more tips on cutting, sewing and quilting are included in my NEW YOUTUBE video!!! You go to YouTube videos and find The Fabric Hut/Quilt. Scroll down and look for Marc and Libby. Marc is thefabrichut.com rep, and I’m the star–my 15 minutes of fame. HAHAHA! https://www.youtube.com/watch?v=prUBxf4fuQ8
I have another quilt design in the works along with some other excitement coming up. Two of my wall hangings were chosen for a very selective exhibit, opening in June, at the prestigious Montgomery Art Gallery. AND I have a solo exhibit in downtown Montgomery all of August–it’s on EMBELLISHMENT, so it’ll include a lot of clothing and accessories. I’ll be teaching some sewing- without-a-machine classes there as well. In the meantime, I have some items for sale at The Tea Garden in Montgomery and The Kelly Art Center in Wetumpka, I’m new president of the Elmore County Art Guild….and my husband and I have been traveling a lot…
…so please forgive me for not posting for a while. I’ve been up to my ears, working at other things. Facebook froze my account, including my business account, when I got hacked by a bad-actor, so that burst my bubble as that’s how I advertised my website. @#$!@#! I admit it. After that, I just got depressed about it and wasn’t blogging or designing. But no more pity party and excuses!!!!
Thefabrichut.com wants me to do more YouTube videos, so I’m getting inspired again. I should have some new items out quickly. Stay tuned and come get a darling pattern while it’s on sale!!
Helpful tips for rotary cutting quilts and other projects–tools, process, great ideas from Libby Christensen of sewgocreate.com
So much to cut, so little time! I wanted to share a few tips on cutting out quilts today (or TOMORROW or THE NEXT DAY)!
1–PRECUT.
a)PRE-WASH. Get fabric ready. Much of the newest quilt fabric doesn’t have to be pre-washed because it shrinks and fades minimally. However, if it has intense color, is going to be paired with white or light fabric, or it’s slightly “hard” finish, I always pre-wash, using ShoutColor Catcher sheets. Sometimes, when dealing with something like batiks or over-dyed fabrics, I wash it several times. I also pre-wash any piece that has been stored with lots of folds. (If you have kids or grand-kids, the used sheets are great to cut up for collages–I give mine to the kids’ room at at art gallery.)
Pre-wash bright fabrics with Shout Color Catcher sheets.
b) PRESS. Good idea. I don’t always do this, but at least you should fold the fabric properly, lining up the edges, and smooth it out.
2--PREPARE TOOLS.
a)6″x 24″ ruler . I realize there are still a few quilters who use scissors, but we’ll leave them in the 20th century and assume you use a rotary cutter and ruler. A serious quilter needs a 6″x 24″ ruler because it reaches all the way across the 22″ folded fabric. We generally cut strips ACROSS that width. Smaller rulers are convenient, less bulky, for the smaller pieces made from the strips but not strictly necessary.
b) ROTARY CUTTING MAT. Although you can make do with a smaller mat, you really need a 24″ mat. I’m sorry they’re so expensive, but they sometimes go on sale. Watch for coupons. (https://love-sew.com/collections/catalog has one on sale right NOW [Oct 26, 2024]. Sometimes JoAnn Fabrics has a coupon.)
c) STICKY NOTE PAD (optional). If you have multiple strips the same width, try “marking” the measurement with a couple OF STICKY NOTES on the measuring line, making it easier to see. (Also great for notes to yourself–use a pin or clip because they won’t stick to fabric.)
Use sticky notes to mark the measuring line.
d) GOOD ROTARY BLADE! By “good,” I mean titanium. The steel ones don’t last as long–trust me! I’ve wasted money on them. The best I’ve found are from thefabrichut.com. I indulge in lots of them when they’re on sale. Also, if you cut a lot, you might invest in a sharpener. I have a handheld one that’s cranked, but there’s also an electric model available–a bit pricy, but maybe Santa could bring you one!
e) CHANGE BLADE??? NO, I do not change with EVERY project because some projects are small. However, you’ll know when the blade isn’t cutting as easily. I then mark it with a “magic marker” as “OLD” and set it aside to sharpen.
3–LINE IT UP. Generally, cut along a grain line unless you’re cutting bias. I always start by cutting off the far right edge to make sure it’s square (note that my edge is serged before pre-washing). Some people also like to cut off the selvedge–I don’t bother, but suit yourself. Remember to always measure with the RULER lines, not the mat.
Cut off edge to square up fabric.
4–DO NOT SLIP. I suggest holding little finger on the fabric and the others on the ruler to keep it from slipping. You can also buy little stick-on grips for the back of the ruler. STOP! KEEP HAND IN PLACE AFTER CUTTING, and pull off the strip here, or remaining fabric usually, with your other hand. If a few threads didn’t get cut, and it needs to be re-cut, you’ll already be in place. (If this happens too frequently, go to #2e above.)
Keep hand in place in case you need to recut.
5–MAKE THE CUT…straight down with pressure. Many quilters suggest standing, which is a good idea when cutting a lot. However, you can cut from a seated position IF you remember to hold the cutter so that the blade is straight up and down. ..AND apply pressure. A knife or blade doesn’t cut by itself! You must push it. Put your shoulder into it. (If it’s too hard to do, go to #2e! Also, there are some different styles of cutters you can experiment with that might be more comfortable.)
6–STAY ORGANIZED.
a) I heartily recommend Wonder Clips for holding different sizes or colors of strips and blocks. You can clip on a sticky note to mark the size. Wonder Clips are widely available, but check around because the prices vary hugely. I’ve gotten a good deal from thefabrichut.com, but I’ve also bought them as specials from other places. I use them all the time now. The larger size holds a bigger stack of fabric. (One cool point is that because they’re metal, they can stick on my magnetic pin cushion, magnetic cups or be picked up off the floor with my magnetic telescoping wand.)
Use Wonder Clips to hold different size pieces.
b) Gather up the cut pieces in whatever way pleases you. You can consider bags, boxes, bins. This really depends on the size of the project, what you have on hand, and the room you have. I’ve used everything from large ziplock bags to shoeboxes to specially dedicated plastic bins. MadamSew.com even made some little zip bags, called binder pockets, with grommets to fit in a notebook for small items, but they are sold out at the moment. https://madamsew.com/collections/organization-storage You could probably find something similar in the notebook section of Walmart or office store, but I like that these are clear.
What’s next? You know the answer. Thread up the machine and sew!
Do you know what that is? It’s not terribly well known because it involves a rather tedious process. Traditionally, you sew/quilt around a pattern or shape. Then from the back side, you slit the backing, stuff in some poly fill and close it by whip-stitching by hand. Slow, right?
It doesn’t have to be. It’s as simple as using two layers of puffy batting–polyester, not cotton. For my quilt, I cut a large central rectangle about 16″x18″, backing a bit larger, and two layers of batting. I cut the top layer just a scant bit smaller to help avoid making the side seams too thick.
Layer up and pin or baste. For something small like this, I usually just pin, but suit yourself. (You can even get special quilters’ safety pins.) I admit to using straight pins, but I DO sometimes stick myself. (I keep little alcohol pads in the sewing room to clean up any blood.)
Working on the top, simply quilt around the figures through all four layers. You can quilt by using a quilt hopping foot and lower the feed dog for free-motion. Or, you can just drive your machine along the lines. Truly, it’s not hard.. The layers of batting will automatically puff up the areas inside! (See photo below.)
“Those Wild Eye” center trapunto by LJ Christensen
You can make one central block like mine (below) or several small blocks. It’s just a matter of the effect you want. For my “Those Wild Eyes” lap quilt, I added a little folded black border around the center piece, then pieced on large blocks of different animal skins as well as some other lengths of border fabric. I drew up the pattern on graph paper to easily figure the finished block sizes.
“Those Wild Eyes” lap quilt in Art Gone Wild Kelly Art Center exhibit 2024
But wait, what about quilting the remainder of the quilt? Georgia Bonesteele wrote a book about quilting sections and then combining them. However, I just loaded the top on my longarm with the center all puffy and quilted the top, sides and bottom. THEN I went back and sewed again through all, including the final backing–yes, top, 2 layers of batting, first backing of that section and then final quilt backing. Since it’s hard to control free motion on a longarm, I used my regular machine and retraced the earlier stitching, this time attaching it to the final quilt backing because I couldn’t leave that much space all unattached.
It was a little time-consuming to resew around all those faces, but it was definitely faster than stuffing and hand-whipping. And the final result is wonderfully appealing puffy texture!
Just add trapunto as one more technique to play with, maybe on a wall hanging or baby quilt. I guarantee everyone will want to touch your quilt!
Me, too! I haven’t blogged in a while because….let’s blame it on my husband who retired. This spring and summer, I’ve been to Md coast, to Tuscon and to Savannah (for the FIRST TIME.) Oh lovely Savannah! We’ll have to return when it’s not as hot, but those trees and beautiful houses. WOW!
Beautiful Live Oaks and mansions in Savannah–photos by L. Christensen
This became the inspiration for my latest arty wall hanging. However, it was a real challenge. No REALLY, a “challenge”! I was using the six fat quarter batiks from the Keepsake Batik Challenge 2024. You must use four and may add only two. HMM. Can you find them?
“Live Oak Bay” by L Christensen 2024
The cloudy blue sky is a blue/white leaf print, not ideal except for color, but the other blue came mixed with the green, pink and yellow. I picked out the blue/green sections for the water and used the yellow for sand. I didn’t have enough pink for a full house, so I used pink and some blue. The green is a floral, but I cut out some of the flowers to applique under the tree, and cut up the fabric enough so that it just suggests the shading of green leaves instead of flowers
Another fabric was a fern–pinks and blues on purple. That was challenging, but I turned the ferns into a couple of small trees. I also cut up some of the ferns to make them look like boards on the cabins. I used some of the wine/garnet-colored rose fabric to make little yoyo flowers on the side of the house and the sailboat. The final fabric was little green vine-y flowers on navy. They don’t show up much, but I worked in some little pieces beside the tree and pink fern tree.
Most of the background–white, sky, sea, sand–I pieced in log cabin pieces, carefully fussy-cutting the colors to make sand, sea and clouds. I then stitched in the ditch to quilt the top area. The cabins I pieced separately and put them on fusible fleece to give them a little depth when I appliqueed them.
The tree was interesting. I ironed fusible web (Wonder Under) onto a big piece of brown. I hand-cut a tree on a big piece of wrapping paper for a general pattern, laid it down on the quilt to check it and tweaked it to make it fit properly. Then I was able to use it for a template for the trunk and branches. I fused web onto the green fabric, too, and just hand-cut the leaves in small “bunches.” Fortunately, live oaks have sparse, clumpy leaves because I barely had enough for leaves and some of the grass/bush/flowers in the foreground.
White sail against white is not ideal in order for the sailboat to be seen, so I backed it with fleece and folded the edges to make it stand out a bit. Other pieces like the rowboat, pier, and windows/doors, etc., were simply fused on, then machine appliqueed. I satin-stitched the trunk/branches, but just free-motion-quilted the leaves and flowers. I added rows of curved quilting for the beach and waves for fun and texture.
To make this the required 30″x30″ size, I had to add the white frame-like border. My white-on-white fabric was too thin, so again I fused a layer of fleece on it and took the trouble to miter the corners. (You just have to pin and fiddle to get them to fit correctly.) I liked binding it with the brown because the thin strip echoes the size of many of the limbs.
It probably won’t win the challenge, but it was a really fun project to take on. It’s currently on display in the Selma Art Guild Summer Show in Alabama and will go to several more art shows this year, so it’s well worth the effort.
This is NOT a pattern. However, I have some tips for creating “picture” wall hangings:
1) You can often buy pictorial fabrics like boards, grass, clouds, which is fine; however, don’t be afraid to use something unusual in a creative way.
2) Definitely use fusibles. They make life easier even if you later machine-stitch the edges.
3)Break the rules. Use different stitches, different quilting, whatever you like. The point is to be creative.
4) You can put a classic “sleeve” on the back to hang it, but I’ve found it really more convenient to use curtain hooks (rings with clips attached—see pic above) because you don’t even have to have a pole.
Now why not go make a picture of YOUR vacation? Trust me; it’s fun!
I’ve been playing with scraps since I was about 4-5. My mama made me gorgeous Barbie clothes but complained that I tried to make my own by wrapping them in scraps.
I can’t help it. I LOVE scraps. I can’t throw them out, especially cotton. But sometimes I get on a jag to use some of them up. That happened this week. I just can’t seem to start on anything new until I clear out some of the piled-up cluttery scraps. AT LEAST I had many of them cut into 3″, 2 1/2″ and 2″ squares. That helps because I can usually get rid of under 2″ by saving them to give to children for collages.
The piles of squares get sorted by size and color and become charming little jewels of miniature quilts aka hot pads, more than I’ll ever need myself for cooking but fun to have at craft fairs or for gifts. I use up cotton batting, too, two layers.
I just quilt these diagonally most of the time, in robotic mode, sewing corner to corner without marking. However, they could make great little practice projects for quilting. Below is from a bigger quilt, but you get the idea, here a spiral sun. Not perfect, but hey! It’s quilted, right?
It’s also great practice for binding. I think I can almost bind in my sleep now! By the way, all my patterns give binding instructions. I usually say to sew to the top and wrap to back, then whip by hand. The reality for me, though, is that I sew to the BACK, wrap to the front and topstitch, using an edgestitch foot (with a blade down the middle—not a cutting blade and not the hemming foot).
If you just can’t tolerate another hot pad and need more of a challenge, you can always try a scrappy pattern. This kite pattern is done with paper-piecing, and mine was a “charm” quilt with every fabric different. That’s always fun!
If you need something more planned and organized, make your own pattern/color combination in a quick runner. Not everyone can tolerate a mishmash of colors. This may be more soothing to your psyche and you can make any length you want. Having one solid/semi-solid color repeated throughout gives it some stability or anchor.
This little log cabin is even a scrappy quilt, just done with blues-purples and pinks, but little scraps paper-pieced: “Love in a Little Log Cabin” wall quilt. You could actually just use bigger log cabin block and make a bed quilt, but then you probably wouldn’t be able to use up too many scraps.
Announcement of a new kit, 42″ x 54″ lap quilt, “Rainbow over HIS Head,” designed by Libby J Christensen for http://www.fabrichut.com . Reasons to buy quilt kits.
The kit will have all the fabric for the quilt, including binding and backing. No, I don’t know the cost yet. I just sent them the files; it should be available soon. They sell on line only, at the website–fabric bundles, kits, and GREAT titanium rotary blades!!
Along with the design, I taped three videos, giving tips on pre-washing, cutting, sewing, quilting, and finishing the quilt. The videos will likely be available on the media page of TheFabricHut.com Facebook group page–it’s free to join. They have over 10,000 quilters from all over the world posting, lots of pictures and even free patterns.
I almost never buy kits, but once in a while, there’s something you just have to have. This next one I made for my son for Christmas. It’s called “Cosmos” by Jason Yenter, and I never could have found those particular prints any other way.
“Cosmos” by Jason Yenter, made and enlarged to queen size by Libby J Christensen
I felt a little guilty because I usually create my OWN designs, but my son loves it, so it was worth it.
Sometimes a kit can be a real timesaver, too. You often just get the fabric pieces and have to cut them yourself, but sometimes the kits include precuts. For instance, the new Rainbow quilt will have 2 1/2″ jelly roll strips. I used three of them sewn together to form the cross, five more for the border, and five more for the binding–minimal cutting!
So the moral of this story is…don’t be afraid to buy kits. You might get something special and save time in the process. Although I personally love to chase down the fabrics, there are occasions when time or selection becomes an issue to consider.