Patriotic patterns on half-price sale this July 2025: quilts, throws, hot pads, runners, apron! 3-D, folded pocket, strip piecing–good variety
FIZZ, SMACK, FLARE, CRACK!!!
What an exciting year to be celebrating July 4th!! As an Air Force wife, I have designed quite a few. Enjoy checking them out below, both the little projects and the big ones!
Do you want a QUILT? Try “Salute the Colors”! Made here in queen-size, but can very very easily be sized for a throw or smaller quilt. AND it’s doesn’t have to be red, white, and blue. (As much as I love my country and flag, it’s not my choice of bedroom colors!) https://sewgocreate.com/product/salute-the-colors-cc2301/ $7.50.
Think about next July, but also think about Christmas and birthdays. A lot of these patterns are quick projects, so buy ahead! Be ready! (Do as I say, not as I do….I’m never ready!! HAHAHA!!)
Enjoy the holiday and enjoy browsing through the links!
Pumped up in hot Alabama, listening to fireworks–hoping the neighbors don’t burn down the neighborhood, Libby
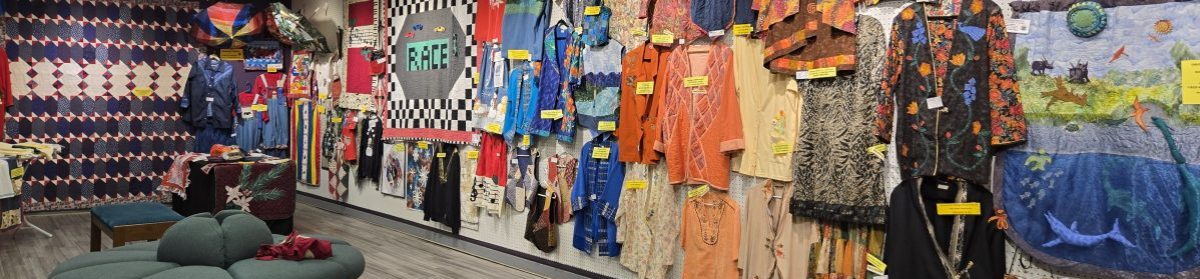
Sixty Christensen Creations SewGpCreate quilts, large and small, are hanging in the Anita Folma Gallery in Montgomery, AL, the month of January 2024. Made and designed by Libby Christensen, many are samples for her website. Other more complex wall hangings were created for art shows, two winning “Best of Show.” Jan 19, 1-6, open house, art talk 6-7:30 on “Quilts: Art or Craft?”
Nearly 60 of Libby Christensen’s quilts are currently on exhibit in downtown Montgomery, AL, at the Anita P. Folmar Gallery in the Learning Arts Center throughout January. (It’s on 1018 Madison by the Cramton Bowl.)
My opening reception was this past Friday, but there’ll be an Open House Reception with demonstrations 1-6 on Friday, Jan. 19. That’s followed by an art talk I’ll give on “Quilts: Art or Craft?” If you’re in the area, please join me!
This is a huge honor to have the whole gallery to myself. I’m absolutely delighted, and the powers-that-be seem very pleased. I’ve already been asked to teach and to do another show in the future, perhaps on “Embellishments: Clothing, Accessories, and Decor”–we’ll see what ensues! Here’s a sneak peek.
Although many of the quilts are samples from my https://sewgocreate.com website, there are others from art shows and old ones rarely seen. Here are some unusual ones that are rather fun: “Audacious Cretaceous” (below left) commemorates the meteor that created the valley of my town, Wetumpka, with dinosaurs and plants from that time period. The triceratops are pushing the T Rex over the cliff, and the water is made of sheer blue gauze with stuffed sea creatures underneath. The “Kite Charmer” is a paper-pieced charm quilt (every fabric different) and the froggy is “‘Gotcha! Quoth the Silver-Tongued Frog Prince Gobbling the Y2k Bug.” (If you’re too young to understand, ask your grandparents about that!}
On the right is “Kelly’s Mantel,” made for the Kelly Fitzpatrick Center for the Arts in Wetumpka. Director Jennifer Eifert wanted a mantel for Christmas, so I made one!! The ”painting” is in Kelly’s style and colors. Above are two of my many Platter Pad designs–tiny quilts that double as huge hot pads.
This next one below is one of two wall hangings that have made “Best in Show” at an art show; this one won at a SAC’s Water Show (Society of Arts and Crafts in Central Alabama). It depicts the town of “Tallassee Now and Then” with my photographs printed on fabric. The town is known for its crumbling red bricks and unusual awnings downtown, with a river/dam in the background.
These give just a sneak peek. Eventually, I’ll try to make some videos to post, but in the meantime, please stop by to see them in person if you can. You’re allowed to touch and take pictures!
AND….for those of you near Montgomery, I’m now part of Artists Alley at Amy’s Flea Market and Antiques on the bypass. Come in and head left. I only have a few screens and one shelf as part of a group, but I’ve displayed some photos and a few crafts. (Hey, I’ve got to use up those scraps!!!) At the moment, I have marked-down Xmas ornaments, towels and hot pads, but soon I’ll put out some valentines!
I’ve been so tremendously busy with craft/art fairs that I haven’t blogged in quite a while. However, I thought I should at least wish you a Happy Thanksgiving. If you respond to this email with a holiday wish to me at libbychr@yahoo.com, I’ll send you the pattern for free!
Not so much here–still pushing 80 and most leaves are green, but fall is around the corner. I’ve noticed pumpkins are appearing on steps, beside carts, and in the super market. It’s a time for switching from pinks to oranges. Suddenly, those spring flowers look a bit garish and out of sync. When that happens, we change our wardrobes and start adding some blacks and browns to tone things down. The same goes for our sewing room. it’s time to think about other colors and designs.
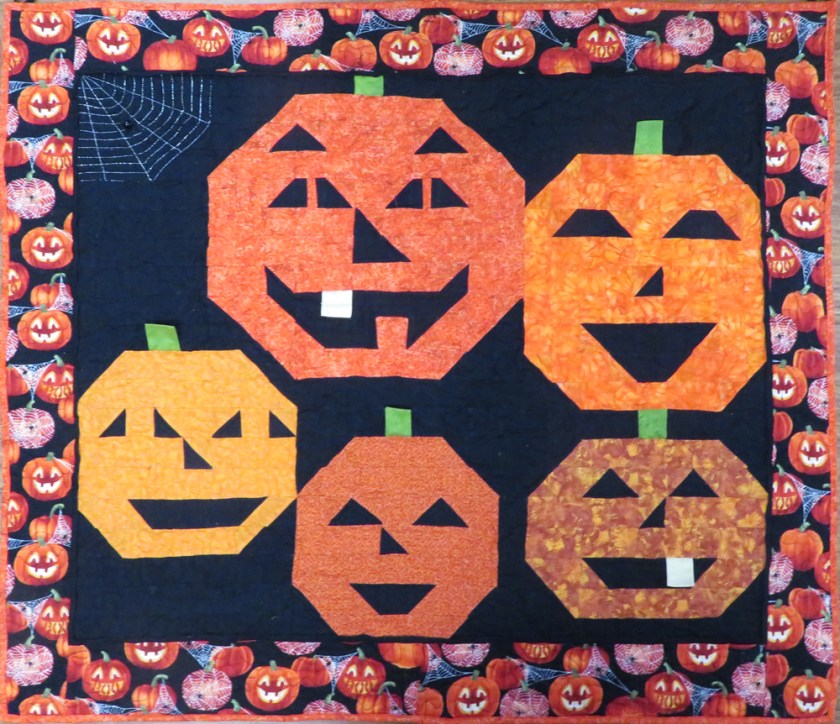
I’ve never designed an entire quilt for fall–probably because it seems so fleeting with the Christmas season starting in September. However, it’s fun to work on runners and hot pads that scream AUTUMN. Choose your method–piecing or spplique –and make some pumpkins….(or spiders!)
Great Pumpkins Runner in 3 Sizes #CC240
Halloweensie Weensie Spider Wall Hanging #1027Ms. Spider Spins at Night HUGE platter pad #2027
Pumpkin Time HUGE platter pad $CC2024
Jackson-o-Lantern Five Lap Quilt or Hanging #CC2313
Look at that happy family above! Make your own family happy with some cute pumpkins. Whether subdued and elegant or bright and cheerful, there’s surely at least one you like!! Browse for these and more fall patterns:
https://sewgocreate.com/ There’s a great search bar. Order with a credit card and the pattern comes directly to you, but please give us some time because it’s not automatic–we have to jump through a few hoops to get it sent!
THANKS! Libby
PS You can also find me in the Facebook group: thefabrichut.com Join more than 10,000 quilters around the world for free. it’s a fun group. On the “Media” page, there are several of my “sewalong” tutorials with lots of tips! A new one on Tips for Sewing Tips is coming in a week or so!
In honor of my collaboration with Madame Sew, I’ve put all my yoyo patterns on sale. Try one!!
Happy to Gladiolus Platter Pad #CC2012
Glad Not Nana’s Yoyos wall hanging #CC 2100
“Glad to Have Scraps,” a slightly smaller version of the pattern above, made of thefabrichut.com “fat fifths.” Part of “Glad Bundle” #CC 3000
Glad Jacket (made from sweatshirt) #CC 2202
Here’s the ringer!!! The TIRES of these race cars are yoyos. I added a button on top!
Fast Track, single bed quilt #CC 2312
Yoyos are sewn by hand, but the fun part is that they are so small that they’re easy to carry with you to meetings, doctor appointments, ballgames, etc. Also, you can make them from scraps. I LOVE using up the scraps, don’t you?
Thanks for checking out my guest blog! If there’s a place to leave a comment, I appreciate a kind word.–Libby
Libby Christensen of SewGoCreate.com gives step-by-step instructions on how she makes Bowl Cozy hot pads for the microwave. Photos and diagrams.
…by making Bowl Cozies for the microwave. Use the little “ears” to pick up the bowl; then the cozy continues to keep it warm.
Photo 1: Bowl Cozies in blooming colors by LJ Christensen
These bowl cozies are not only cute little gifts, but they are great for using up old fabric. They’re all the rage in the craft markets, and I’m on the band wagon because I’ll be a the Charis Crafters’ huge spring sale on April 28, at the Wetumpka Civic Center. (For admission, just bring a donation of food or a few dollars for the local food bank.)
SUPPLIES: For a medium serving bowl, you need 2 fat quarters of coordinating fabrics and 32″ by 16″ of cotton batting, just under 1/2 yd. And thread, sewing machine, scissors and pins. That’s it! Here’s how I make them:
1) Start by cutting 16″ squares: 1 each from the two fat quarters, and I like 2 layers of cotton batting, so 2 squares of the batting. You’ll be making 4 darts in the middle of the sides that make the sides stand up. (What I recommend is to make a pattern first out of paper or interfacing. All you need is an 8″square, which you can get out of regular computer or lined paper; this will represent one quarter of the 16″ square folded into fourths.)
2) To shape the fabric and batting pieces, first fold them in fourths. Following the Cutting Diagram above, cut darts and a curve. (If you have a template made, it’s easy to lay it down, lined up with the folded edges, then clip off the 3 corners. )
Photo 2: a fabric layer topped by trimmed batting layer. (The 4 V cuts are darts).
3)Press the fold linesof the fabric pieces!Pin a batting piece to the back of a fabric piece. Trim off 1/8″-1/4″ of the batting edge to remove bulk (as in Photo 2 above) Flip to the fabric side and sew a seam along each fold. (This quilts the pieces together. See photo 3 below.)
Photo 3: Quilting an X along folds from dart to dartthrough 2 layers, one fabric and one cottonbatting.
4) Next, fold the darts, which are the V cuts (with fabric right side to right side and batting on the outside)and sew the 4 darts with 3/8″ seams. Repeat with 2nd fabric and batting. (Notice the little dart seam in Photo 4 below.)
Photo 4: Bowl cozy 2-layer pieces pinned together, all the way around, matching 4 darts to 4 darts. Leave open about 4″ for turning, here between the two pins and next pin to the right .
5) Pin together the two batting-backed fabric pieces right side to right side.Sew with a 3/8″ seam most of the way around, leaving 3-4″ open (as in Photo 4 above.) Turn right-side out. (I then usually press around the edge.)
6) While it’s optional, I like to use an edge-stitch foot and stitch around the edge. I then stitch again about 3/4″ from the first edgestitch (as shown in Photo 5 below).
Photo 5: Two rows of optional edgestitching.
7)Finish by sewing a square inside, around the crisscrossed quilting seams. It’s hard to explain, but what I do is pin together the top and bottom fabric pieces together about 1/2″ below each dart, being sure that the pin picks up the quilting stitching on the fold on top AND on bottom. Then I sew diagonally from pin to pin, making a square. See Photo 6 below. (This provides morequilting through all layers and holds the bowl shape in place better. The pins help keep the stitching accurate on bottom as well as top.)
Photo 6: Quilting an interior square from end of each dart through all layers.
Done. No hand-stitching at all. And you’ve used up a couple of orphan fat quarters or some leftover fabric. I always have leftover batting, too. I don’t know who first came up with this idea, so I can’t really give credit where it’s due. I just know that this is MY method! You can make smaller ones, too, for soup bowls–just decrease the size of the original squares!
WATCH for my next blog, which is a guest blog for MadamSew.com on Making Fabric Yoyos. It’s due to be published around April 24, 2023. I’ll post a reminder when it comes out. You might want to check out An Kesanne’s Madame Sew video on THESE bowl cozies. She shows how to make SMALLER “bowl holders”: MadamSew Sewing blog I like their sewing tools, and I’m very happy to be collaborating with them.
PS Look for the DOWNLOAD button below to get a nice copy of this to print!
(and don’t forget to browse through the patterns! 😉
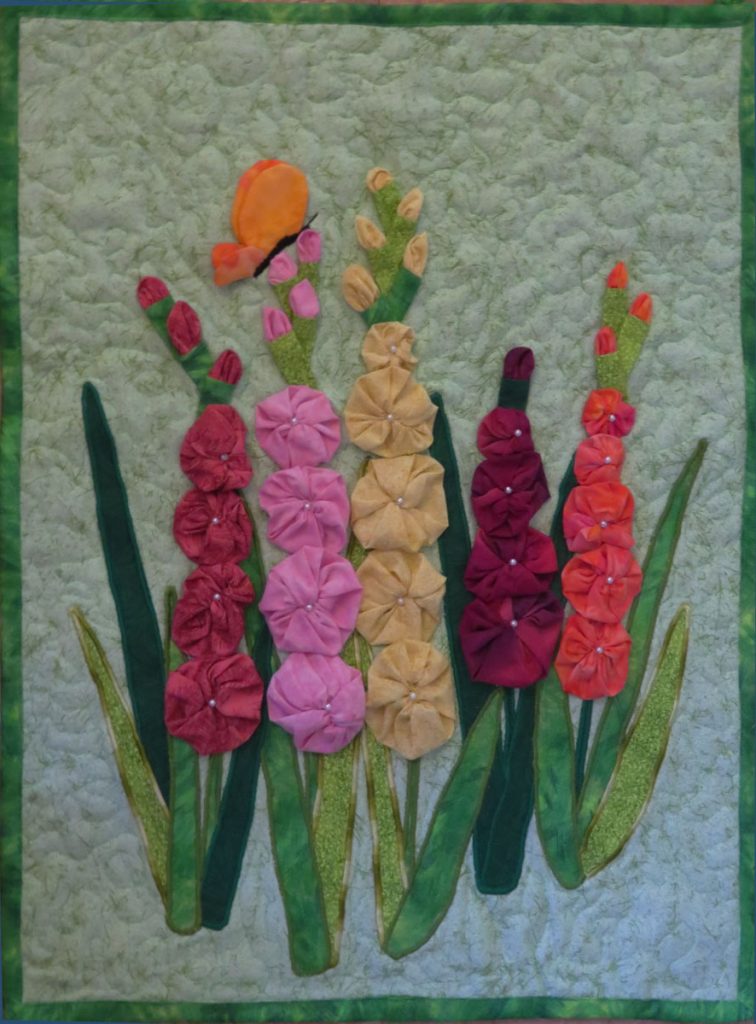
Bundle of gladiolus patterns and a lap quilt pattern. Made of yoyos, the glad is 3D on a hot pad, wall hanging or sweatshurt jacket. The lap quilt is a crowd of bright flowers. Christensen Creations at sewgocreate.com
I’ll be on Facebook LIVE again, but you have to get a membership on the Facebook group–TheFabricHut (be sure to add THE because it’s different from Fabric Hut.) All you have to do is ask and they’ll let you in–it’s a fun group of quilters/sewists from all over the world, sharing opinions and showing pics of beautiful quilts that make your heart smile!! I’m now designing some special quilts for them and will be doing a show-n-tell FB LIVE for them every month.
What I’ll be doing Aug. 19 is showing how to make a gladiolus out of yoyos and some tips on fabric fusing–definitely low-sew techniques for this wall hanging:
The pattern above was tweaked to use the SCRAPS!!! from the fat fifths in www.TheFabricHut.com’s “Telas Bundle” after I had already made the quilt and pattern below. I simply added the 2nd pattern at the end. They send those two to you free if you order the Telas Bundle of 35 solid colors.
“Bundle of Blossoms” by LJ Christensen
I had already designed the glads for the wall hanging below that is just a little bit bigger, called “Glad Not Nana’s Yoyos.” Also, just a tad more complex, mainly more leaves and buds:
“Glad Not Nana’s Yoyos” by LJ Christensen
Because this month is my birthday–you have to cry or celebrate, right?–I’m celebrating by offering a special bundle of patterns: GLAD bundle! It includes all my gladiolus patterns–both wall hangings, the “Bundle of Blossoms” quilt, a sweatshirt jacket (ANY size), and a huge 12″ Platter (HOT) Pad, (last two below) all for half price, $10, and ON my birthday, you’ll get a slice of cake! (More on THAT later!)
“Glad Jacket” by LJ Christensen
You can decorate ANY size sweatshirt and turn it into a jacket! AND easiest of all, the “Happy to GLADiolus” hot pad is 12″ and could also be a quilt block.
“Happy to GLADiolus” Platter Pad by LJj Christensen
Just imagine a quilt with these in every color! Glads are amazingly colorful!
Aren’t they beautiful? Choose YOUR color!
I’m NOT a gardener, but I love flowers. So I have to make them with fabric. I hope you’ll do so, too! It’s fun!
Remember 8/19, but if you miss, it’s OK because the recording is left up on the FB page to watch any time as is the one on “Bundle of Blossoms.” What fabulous new technology!
Well, YOU have to have your back. Blog includes tips on quilt backings. Selection of valentine, love, heart quilt patterns for sale by download. Different sizes from 12″ hot pad to lap quilts. GREAT directions with diagram and some photos.
…Well, YOU have to have your back. When quilting, we have to think about how to make up the back. In my grandmother’s day, they used cheap muslin or a sheet. Actually, a sheet can be a good choice; however, if hand-quilting, be sure to examine the thread count and check if your needle is comfortable sliding through. As for muslin, it’s not a cheap as it used to be (what is?), but you can now get it in a double-wide 90″ in a nice quality.
I will admit that I recently used a (gasp!) POLYESTER microfiber bed sheet, and it was the softest, silkiest backing I’ve ever made. I had pre-washed all the fabric, so why not? We now use polyester thread, which, by the way, works MUCH better in a quilting machine. (My favorite is Omni by Superior threads).
These days, however, there are 100’s of more interesting choices for backings than a solid-color sheet. You can buy 108″-wide fabric now. Although a local shop may not carry many colors, you can go to Keepsake Quilting on line for a huge variety. They sell it by the yard or in 3-yd packages and are currently putting a few on sale every “Wide-Back Wednesday”–some fabulous prints.
You may have to piece the back, though. Buy twice the length you need, of course, but I suggest using one whole width and then distributing the next by cutting it in half lengthwise and sewing half on each side. No particular reason except I think it looks better than a seam down the middle.
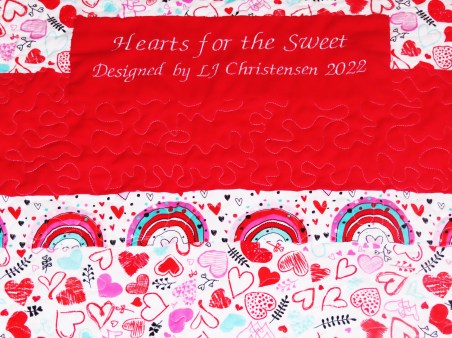
Have you ever had to lengthen a back piece? I certainly HAVE. Sometimes I’m just out of fabric (or I miscut!!! ARGHH) What to do??? No naughty words–just PIECE it. Look how darling this last “Hearts for the Sweet” turned out.
Hearts for the Sweet cc2323
I only had 1 yd of fabric for a 42″ quilt, so I started with a 6 1/2″ strip of the red I’d used on the front. That was the first mistake…I forgot to count in the seam allowance of the one-yard piece. OOPS! 2nd mistake–I shouldn’t have cut the strip until I’d pre-washed the fabric. OOPS again! It shrank. I was a good inch short, yet a backing really should be a little longer and wider. Oh no!!
OK, …back to the drawing board. I had cut a lot of strips of the rainbow print for the ruffle and just happened to have one left–thank goodness! Not only was it 3″ wide, perfect width, but it’s so cute that it looks planned.
I later came back with more red for the embroidered label, which I whipped in the middle, overlapping a bit, just to be artistic. The back of this quilt is almost as darling as the front. Remember that unlike bed or wall quilts, the back on a lap quilt won’t be hidden. The morals to the story are to “Make it Attractive and Remarkable, maybe even Gushworthy” and “Two Wrongs Can Indeed be Righted.”
Hearts for the Sweet cc2323
This new valentine quilt just published this week is simple. It includes directions and lots of photos this time as well as diagrams for inserting a ruffle or a regular binding. After all, we do love our little boys, too–this could be quite masculine in primary colors with vehicles or spiders or something….ick, maybe not spiders with hearts, but you get the idea. The ruffle has lace on the edge, making it extra special, but it’s really fast to make with a binding instead– without having to tediously gather the ruffle. Another idea is to buy wide ruffled lace instead of a ruffle.
If you have plenty of time in the next week, you could attempt this “Check Out My Purple Heart,” but it’d also be great for Father’s Day with its sophisticated spin on mulberry with yellow to tone down the “pink.” It’s also a large 54″ square, a great size for a man (or woman–hey, try it in pinks ,roses or lilac!)
Check Out my Purple Heart cc2309
The wall hanging below will take considerably MORE time and may not be ready until Christmas or someone’s birthday, but it was so much fun to make from scraps. Those are little paper-pieced log cabin blocks, which are easier when sewing small blocks. However, the pattern could easily be enlarged by simply enlarging the blocks and could be sewn traditionally if you prefer. (I’d like to make it queen-sized for my bed, with a rosy burgundy heart.)
Love in a Little Log Cabin cc2108
On the other hand, you may be pressed for time. I get it! You can still create a marvelous little valentine for your sweetheart, friends or family in just a few hours. This 12″ Platter Pad is both useful and decorative. You can even replace the top-sewn lace with double-folded bias tape if lace is inappropriate–super-quick finish–you don’t have to satin-stitch the edge!
Simply Sweet Heart cc2016
I really hope you’ll take time to sew a special valentine. So precious–so few calories! I’ve omitted the links for fear of going onto SPAM lists, but you can go to my website: https://sewgocreate.com and easily search “Hearts” or “Love.” Some of these are on sale until Feb. 14….spreading MY love to you. Libby
This is “as easy as pie”–pumpkin, custard, key lime–just choose your filling from scraps of fabric. Applique them onto a plate with a little bit of big rickrack for the crust and YUM! You’ve made the cutest piece of pie ever, with absolutely NO calories!
Don’t miss this darling pattern on sale this week for just $2.50 because you know you’ll need to do some holiday baking. What a precious host/hostess gift this would make for Thanksgiving, or make it for your OWN table for that platter of turkey. These “Petites on Point” platter pads are designed to hang as well, so it’s a great little seasonal decoration.
Some people seem to think that applique is difficult and time consuming. Not necessarily. You can always add 1/4″ and hand-turn the Christensen Creationspatterns, but they are designed for fusible applique. If you’re not washing/drying them a lot, you can just fuse. It works fine. After a lot of drying, though, sometimes the fusing glue might begin to detach.
That’s why I recommend satin-stitch machine applique for washable items. It’s not hard, especially if you fuse first. Then it doesn’t slip, and you don’t have to pin anything. Here’s the first tip. Fuse the double-sided fusible web (such as Heat’n’Bond or Wonder Under) to the back of the fabric. Leaving the paper on, cut out the pattern pieces. This assures that you get fusible web right into the corners. Let it cool.
Place the applique pieces on the fabric, but do not remove the backing paper until you are ready to fuse. Use a pin or needle to “score” the backing; this allows you to peel it off without picking at the corners and possibly disturbing the threads.
STOP! Note that some pieces may very well overlap others. I suggest placing and stitching the underneath pieces first. You may not need to stitch the entire edge, though, if it’s to be covered. (NOTE: You can even MARK where it’s to be covered, using a Frixion pen that disappears with heat, so the mark disappears when you put the iron down to fuse it! Love these pens–available at regular office supply stores like Office Depot.)
The width of the satin stitching is up to you. It needs to be wide enough to take a “bite” into the applique and also into the background. In fact, as you stitch, you should line up the edge of the applique to the middle of the presser foot. The stitch should be close enough together so that it covers, but not so close as to buckle and bunch up. I like to use embroidery thread, but again, that’s up to you.
STOP!Don’t stitch yet! Not before you put a stabilizer underneath! This is really important. My favorite type these days is an iron-on type that doesn’t slip or need to be pinned, but it really doesn’t matter. You can get tear-away, wash-away, heat-away. My mother even used a roll of 2-3″ paper for an adding machine. Paper is not recommended because it dulls the needle, but for a little bit of applique like this project, it doesn’t really matter. You mainly just need to stabilize because fabric stretches just a bit.
As you stitch, just try not to stop and start much. That jerky motion can cause an uneven row of stitches. If you have to stop, make sure the needle is DOWN. Move slowly and steadily around curves. If you’re unhappy with some of the stitches, it’s easy to pick them out because they’re large! The seam ripper can easily cut through a bunch! It’s better, though to restart from a corner than to try to match the stitch from the middle of a row, but it can be done–trust me, I often have to redo.
When finished and tearing the stabilizer off the back, a pair of tweezers is helpful for any small areas. However, it’ll all be inserted between layers, so don’t worry about leaving the smallest bits–no one will ever see them!
(and I’ll never tell….HA!)
If you don’t like to applique–OK! You might prefer these other PIECDED seasonal patterns: click here for “Pumpkin Time” Platter Pad.
it’s PUMPKIN TIME! A cute round pieced pumpkin on a square block, made as a quilt block or huge hot pad for platters or big bowls. Great directions and color diagrams make it easy!
That’s my latest pattern, “Pumpkin Time,” a cute round pumpkin on a square block–easy square block piecing, but four half-square triangles and some color shading make it seem round. Make it as a quilt block on point or as an 8″, 10″ or 12″ huge “platter pad.” They are decorative enough to hang on a loop on the wall, but they double as huge hot pads for platters or big bowls–how perfect for Thanksgiving or any gathering!
Order “Pumpkin Time” for just $2.50 for the next 10 days! Hurry! Click here.
“Pumpkin Time” cc 2024 by LJ Christensen
This one is hanging in the Market Shoppes in downtown Wetumpka, for sale, but it’s first come, first serve, because I’m out of several of the scrap fabrics I used!
Libby’s booth at Market Shoppe, Wetumpka
I haven’t published many patterns in the last few weeks because I’ve been working on some custom quilts. You might enjoy seeing a couple of them. The one below was to go in Market Shoppes, but Shellie Whitfield saw it and bought it before I could put it out. She’s not only the Executive Director of the Chamber of Commerce, but she and her husband own the Big Fish House seen in Tim Burton’s Big Fish movie (filmedin my town, Wetumpka). I used Tim Burton’s “swirlie” patterns on swirly batik and made her house as well as I could:
“Big Fish House” lap quilt by LJ Christensen
Here’s my photo of the actual house, complete with the daffodils she put out as a reference to fields of daffodils in the movie.
Big Fish House, Wetumpka by LJ Christensen
OK, so I didn’t get every detail–the roof isn’t blue, for instance–but their door IS bright yellow, painted by the HGTV team of Erin and Ben Napier when they remodeled the kitchen and entry stairs.
In this close-up, you can see that I used bias tape for the porch and pillars and a button for the door handle.
Big Fish House lap quilt close-up by LJ Christensen
Below is another version I made with smaller squares for a wall hanging that’s for sale in The Kelly art gallery in Wetumpka. It has more of a “Burtonesque” feel with a nightmarish or Halloween theme, black/white squares, and ghosts in the windows.
“Haunted Fish House”
Are you inspired? Would you like to do a house of your own? Go ahead. It takes a little time, but isn’t impossible.
Get graph paper and design the size of your basic squares. I like to start with 1 square = 1″, then I use two across and down for a 2″ finish (2 1/2″ cut). Sometimes small quilts will have to have 1″ finish blocks. Once you get your ratio, it’s not hard. Obviously, you can make rectangles very easily, too. If you have to tape together two pieces of graph paper, it’s OK!
Before you get too far along, decide the size of your quilt. I might do 16″ down x 20 across for a wall hanging, or 42″ across x 54″ for a lap. Sketch basic shapes lightly with a pencil. When you have your shape, keep it simple, but add doors, windows, etc., to make it look right. Angles, when necessary, such as in a roof, can be made with half-square triangles.
Once you get the shapes, use colored pencil or crayons to color them in.
Figuring fabric amounts gets challenging. Look for pieces the same width that could be cut out of one strip. If they add up to over 42″, figure in another strip. Keep adding the inches of each strip needed. Then overestimate. It’s OK to have scraps, but not OK to run out!!
As you design, also think about which pieces could join to make a block so that the quilt can be sewn in sections. I sometimes go back and make a dark black line around those.
The really fun part is shopping for fabric. Look for texture as well as color. There are many choices of brick, wood, tile, and stone prints today. I even found a great background fabric with the clouds over a moon! All I had to do is cut it to place in the right location. Not everything has to be exact; it can just be a hint, like the herringbone tone-on-tone I used for roofing that reminded me of roof tiling.
Just have fun! This shouldn’t be a grind; it should be a challenge, right? If you don’t enjoy it, don’t do it. Instead, buy MY patterns! HA!